Create Motion Graphics with Claude and Remotion AI TLDR…

0 reactions
Create Motion Graphics with Claude and Remotion AI
TLDR: Learn how to use Claude Code and Remotion to build programmatic motion graphics. Master AI-powered video editing and skip manual keyframes.
Github:
https://github.com/balarabetahir/-Build-AI-Motion-Graphics-with-Claude-and-Remotion
A few years ago if I wanted to add motion graphics to a video I had two options. I could learn After Effects and spend hours dragging keyframes around. Or I could pay someone else to do it. Both options were slow and expensive.
This is changing. I recently built a system that generates animated lower thirds, title cards, and diagram animations using Remotion and Claude Code. It took me about two hours. The output looks professional and is completely reusable.
This matters because video is becoming the default medium for communication. More people watch video than read articles. More companies explain their products with video than with text. The demand for video content is growing faster than the supply of video editors.
If I can generate motion graphics from code I have a real advantage. I can iterate faster. I can maintain consistency across hundreds of videos. I can make changes by editing a single file instead of rebuilding everything from scratch.
Let me show you how this works.
The Core Idea
Remotion is a library that lets me create videos using React components. Instead of using a timeline and keyframes I write code. My video is a function of time.
This is a different way of thinking about video. In After Effects I work visually. I move objects around and set keyframes at specific points. In Remotion I work mathematically. I define how each element should change as frames progress.
The real power comes when I combine Remotion with an AI coding assistant. Claude Code can read my project files and write new components based on natural language descriptions. I say “create a lower third with my name sliding in from the left” and it writes the React code.
This means I can build complex motion graphics without knowing every detail of the Remotion API. I describe what I want. The AI translates my description into working code. I preview it instantly. I refine it with more prompts.
The cycle is fast. Much faster than manual editing.
Setting Up My Environment
Getting the environment working was the first hurdle. It was mechanical but important. If my tooling was broken I would waste time debugging instead of building.
What I Needed to Install
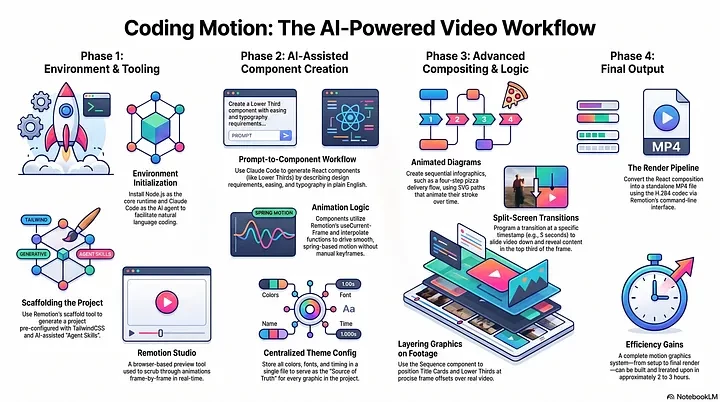
Node.js. This is the runtime that powers Remotion and all its dependencies. I verified the installation by checking the version in my terminal.
Claude Code. This is the AI coding agent that generates my video compositions from natural language prompts. I signed in with my Claude account to activate the tool.
A Remotion project. I used the scaffold tool to generate a project with everything pre-configured. This included TailwindCSS for styling and Agent Skills for AI assistance.
The scaffold command created a project structure that worked out of the box. It installed all dependencies and configured the development environment. Getting this right saved me from troubleshooting later when I was deep into coding animations.
Verifying My Tools
Once everything was installed I confirmed it worked. I ran Claude Code in my terminal and checked the available commands. I saw:
/help to show available commands
/clear to clear the conversation
/exit to quit Claude Code
/compact to summarize the chat context
When these commands responded properly I knew the tool was ready. I moved on to building actual animations.
Launching Remotion Studio
Remotion Studio is my preview environment. It runs in my browser and updates in real time as I change code. I can scrub through frames and see exactly how my animations look.
To start working I needed to:
Launch Remotion Studio from my project directory
Start Claude Code inside the same directory so it could read my project files
Open the browser preview at the localhost address Remotion provided
This setup gave me a complete development environment. I wrote code. The preview updated instantly. I iterated on designs without rendering videos to check my work.
The immediate feedback loop was crucial. It made iteration feel more like coding a website than editing a video.
Building My First Animated Lower Third
The best way to learn is to build something real. I started with a lower third graphic. This is a common element in videos that shows a person’s name and title.
What I Asked Claude Code
I opened Claude Code in my project directory. I gave it a prompt like this:
“Create an animated lower third component called LowerThird that displays my name with my job title below it. Use a slide in from the left with a colored accent bar. Add a smooth fade in. Use the Inter font. The composition should be 1920x1080 at 30fps for 120 frames.”
What Claude Code Generated
The AI wrote a React component that used Remotion’s core primitives:
useCurrentFrame to track which frame is rendering
interpolate to map frame numbers to animation values
Spring-based easing for smooth motion
It created the component file, wrote the animation logic, and registered it in my project as a Composition. I previewed it instantly in Remotion Studio. I saw my name and title sliding in smoothly.
Iterating on the Design
When I wanted changes, I gave follow-up prompts:
“Make the slide in faster”
“Change the accent bar to gold”
“Add a shadow behind the text”
Claude Code updated the code. The preview updated. I saw the results immediately. This was much faster than dragging keyframes around in After Effects.
Creating a Reusable Design System
Once I had one component working I thought about consistency. I did not want to hardcode colors and fonts in every component. That leads to duplication and maintenance headaches.
The Theme File Approach
I created a centralized theme config file. I stored all my design decisions in one place:
Colors for backgrounds, text, and accents
Font families and sizes
Animation timing values like duration and easing
This file became the single source of truth for my entire video project.
Building Components That Use the Theme
I asked Claude Code to create components that read from this theme file. For example:
A TitleCard component for main titles
A LowerThird component for name and title graphics
Any other overlay I needed
Each component imported the theme values. When I wanted to change the look of my entire project I edited one file and everything updated.
Testing the Design System
I tried changing my theme dramatically. I switched from dark mode to light mode. I changed the primary color. I swapped the font.
Both components updated instantly in Remotion Studio. The lower third now had a warm cream background with a gold accent bar. The title card displayed the same styling with the new serif font.
This confirmed that the design system worked. I never had to update components individually again.
Overlaying Graphics on Real Video
My motion graphics were no good if they only worked on blank backgrounds. I needed to layer them on real footage.
Using the Sequence Component
Remotion provides a Sequence component that controls when other components appear. I wrapped my graphics in Sequence and specified:
A frame offset for when they start
A duration for how long they stay visible
This let me orchestrate exactly when each graphic appeared over my video.
Building a Layered Composition
I created a composition that combined:
My video footage using Remotion’s OffthreadVideo component
My TitleCard appearing first
My LowerThird sliding in a few seconds later
I set the frame timings precisely. The title card showed for the first three seconds. The lower third slid in after a short gap. Each graphic appeared and disappeared at the right moment.
Previewing and Refining
I watched the layered composition in Remotion Studio. I saw how the graphics interacted with the video background. I adjusted timing and positioning with follow-up prompts.
This step proved that my design system worked in a real production context. I could control when each graphic appeared, how long it stayed on screen, and where it sat over the footage.
Adding Animated Diagrams
Text overlays are useful but limited. I wanted to do more with animated diagrams that explain processes and concepts.
What I Could Build
Claude Code could generate diagram components with:
Nodes that appear sequentially with scale and opacity animations
Connections that draw themselves over time using SVG paths
Images inside each node for visual engagement
Color schemes that match my theme
A Real Example
I asked Claude Code to create a diagram showing a pizza order process:
Order Placed
Kitchen Prepares
Oven Bakes
Delivery
It generated a React component with:
Each node appearing one at a time from left to right
Arrows drawing between nodes using animated strokeDashoffset
Theme colors for node backgrounds and text
Smooth easing curves for entrance animations
The diagram played through step by step in Remotion Studio with perfect timing.
Overlaying Diagrams on Video
I layered these animated diagrams on top of real footage using the same Sequence technique. This created explainer-style content where diagrams appeared over live action or screen recorded footage.
The timing mattered. The video continued playing while the diagram animated in. The result was a professional-looking educational video that would have taken hours to edit manually.
Advanced Techniques I Used
Split Screen Transitions
I created a sophisticated transition where the video split to reveal new content. Here is how it worked:
The video started full screen for the first five seconds
At the five second mark the video smoothly animated down to the bottom two thirds
A clean dark background revealed in the top third
My diagram animation started playing in the revealed space
The transition used an ease-out curve over 15 frames. I calculated the final position precisely so the proportions looked balanced.
Anchoring Graphics to Moving Video
When my video moved during the transition my overlays needed to move with it. If the TitleCard stayed fixed while the video slid down it would look wrong.
Get Tahir’s stories in your inbox
Join Medium for free to get updates from this writer.
Subscribe
Remember me for faster sign in
Remotion let me position graphics relative to the video frame. I animated the video position and the overlay positions together. This kept everything aligned properly.
Fine-Tuning Motion Curves
Small adjustments in easing curves made a big difference in perceived quality. A transition that was too abrupt felt jarring. One that was too slow felt sluggish.
The AI generated different curve options. I previewed each one. I picked the one that felt right. This was faster than adjusting bezier handles manually.
Rendering the Final Video
When my composition was ready I exported it as a standalone video file.
The Render Process
Remotion provided a render pipeline that:
Processed every frame of my composition
Rendered video footage, graphics, and animations
Stitched everything together into a single MP4 file
I rendered from the Remotion Studio interface. The default settings worked well for my project.
What I Got
The rendered file was a standard MP4 with H.264 encoding. It played in any video player. I could upload it to YouTube or social media. I could use it in a real video production workflow.
The overlays were baked into the video. No external files needed. The video played correctly with all graphics intact.
Key Concepts I Learned
Frame-Based Animation
Everything in Remotion is driven by frames. At 30 frames per second, 120 frames is four seconds. I defined animations in terms of frame numbers.
This precision gave me fine control. I could place events within 33 millisecond increments. This was tighter than most manual editors can achieve.
The Power of Interpolation
interpolate maps frame numbers to values. I used it for:
Position changes from left to right
Opacity changes from transparent to solid
Scale changes from small to large
Color changes from one value to another
These simple building blocks combined to create complex animations.
Component Reusability
React components are reusable by nature. Once I built a LowerThird component I could use it anywhere. I could import it into other projects. I could share it with team members.
This was different from After Effects where each project starts from scratch.
AI-Assisted Iteration
The real breakthrough was iteration speed. I described what I wanted in natural language. The AI wrote the code. I previewed it. I refined it with more prompts.
This let me experiment freely. I tried a different animation style. I tested a new color scheme. I explored a layout option. The cost of each experiment was minutes instead of hours.
What This Enables Me to Do
Personalization at Scale
Now that I have a code-based video system I can generate personalized versions. I can change the name in the lower third for each recipient. I can update the data in the diagram for each viewer. I can render hundreds of videos automatically.
This is impossible with manual editing. The cost per video would be too high. With code-based tools the marginal cost is near zero.
Rapid Updates
When information changes my videos can change with it. I update the theme file and all my graphics update. I change the diagram data and the animation updates. I render a new version in minutes.
This is valuable for training content, product demos, and any video that needs to stay current.
Integration with Data Sources
I can feed data into my video generation pipeline. I can read from a spreadsheet. I can query an API. I can pull from a database. The video builds itself from the data.
Imagine generating a monthly report video with updated charts and graphs. The system renders it automatically. I never touch the animation code.
What This Does Not Replace
This approach is not a replacement for professional video editing in all cases.
Complex visual effects are still easier to create in dedicated tools. Organic motion that requires artistic judgment is hard to specify in code. The AI can generate simple animations but it cannot match the intuition of an experienced animator.
The current tools have rough edges. Rendering can be slow for long videos. Debugging animation timing can be confusing. The AI sometimes generates code with small mistakes that I need to fix.
But these limitations are shrinking. The tools are improving. The AI models are getting better. The gap between code-based and manual video editing is smaller than it was a year ago and will be smaller still next year.
What I Learned Doing This Project
The whole project took about two to three hours from start to finish. The most challenging part was getting the split screen transition timing exactly right. I had to iterate on the ease-out curve and the final position offset to make the motion feel natural.
Another tricky moment was making sure the TitleCard and LowerThird stayed anchored to the video as it moved down. The coordinates needed to be relative to the video frame, not the full screen.
Once I described what I wanted clearly to Claude Code it handled the coding quickly. I just focused on previewing and refining the feel.
The project taught me:
How to build a reusable motion graphics system with code
How to centralize design decisions in a theme config
How to use AI assistance to generate and iterate on animations
How to layer graphics on video with precise timing
How to create animated diagrams and transitions
My Next Steps
If you create video content you should learn these tools. The time investment is modest. The payoff is substantial.
Start small. Build one animated overlay. Use it in one video. See how it compares to your current workflow. Then expand from there.
The real long-term value is optionality. Once you have a code-based system you can do things that are hard with manual tools. You can generate multiple versions. You can personalize for different audiences. You can integrate with data sources.
Video is not going away. The demand for it is increasing. The people who can produce high-quality video efficiently will have an advantage.
Code-based motion graphics is the lever. I pulled it. You should too.
Github:
https://github.com/balarabetahir/-Build-AI-Motion-Graphics-with-Claude-and-Remotion
Further Reading:
🌉 Bidirectional Design to Code via Paper and Claude Code MCP
🤖AI-Powered Project Management with Linear and Claude MCP
Defense-in-Depth Multi-Layer Security Guardrails for Claude Code
🤖Automating Git Workflows with Claude Code Skills
🤖 Building a Portfolio with Claude Code
🎧 Build a Spotify Clone Database With Cursor and Supabase MCP
🤖Building Spotify Clone Features with Claude Code
Build a Spotify Clone with Cursor
Automate AI Second Brain(LLM Wiki Pattern) With Claude Code and Obsidian
Build an AI Second Brain(LLM Wiki Pattern) With Claude Code and Obsidian
🛡️Building an AI-Powered Python Security Scanner with Gemini
Architecting Autonomous Deep Research Agents with LangGraph
How to Ship a Landing Page with v0 and Vercel
Build a Telegram AI Bot with 🦞OpenClaw + Anthropic API
Engineering Persistent Memory and Personality in OpenClaw 🦞
Automate Your Daily AI News with OpenClaw 🦞
🤖Building a Local Multi-User RAG API with FastAPI
Part 1: Building AI Data Governance
Part 2: Building The HR Agent
Part 3: Evaluating and Deploying the HR Analytics Agent
Build AI Customer Support Agents with PydanticAI
Frequently Asked Questions (FAQ)
Video Editing with Claude x Remotion
1. What is Remotion and how does it work for video editing?
Remotion is a React-based framework that lets you create videos using code. Instead of dragging keyframes in traditional editors, you write components that define every frame of your animation. Each frame renders like a React component, giving you precise control over motion, timing, and visual elements. Remotion Studio provides a real-time preview where you can scrub through frames instantly.
2. Do I need to know React to use Remotion effectively?
Yes, basic React knowledge is essential. You need to understand components, hooks like useState and useEffect, and how props work. Remotion extends React with video-specific hooks like useCurrentFrame and useVideoConfig. If you are new to React, the learning curve is manageable with basic tutorials. Claude Code can help generate components, but understanding the code structure helps with troubleshooting.
3. What is Claude Code and how does it help with video editing?
Claude Code is an AI coding assistant that generates, modifies, and improves code through natural language prompts. You describe what you want to build, and Claude writes the React component code for you. For video editing, this means you can say “create an animated lower third with a slide-in effect” and Claude generates the full Remotion component with proper interpolation and timing logic.
4. Is Claude Code free to use?
Claude Code requires an active Claude subscription. Pricing varies based on usage and plan tier. The tool offers a sign-in process that activates the AI capabilities. Check the official Anthropic website for current pricing details and free trial availability.
5. Can I use Remotion for professional video production?
Absolutely. Remotion is used by companies for marketing videos, social media content, presentations, and automated video generation. The code-based approach enables consistent branding, version control, and automated rendering pipelines. Many professionals prefer it for projects requiring precise timing and repeatable results.
6. How long does it take to render a video in Remotion?
Render time depends on video length, resolution, frame rate, and effects complexity. A 10-second 1080p video typically renders in 30–60 seconds on a modern machine. Longer videos with complex animations or multiple video layers may take several minutes. Remotion Studio provides a render button that processes frames sequentially and shows progress updates.
7. What video formats does Remotion support for export?
Remotion primarily exports MP4 files using H.264 codec, which is widely compatible with YouTube, social media, and most video players. You can also export WebM format for web use and image sequences for specialized workflows. The render settings let you configure codec, resolution, and frame rate options.
8. Can I add my own music or audio to Remotion videos?
Yes, Remotion supports audio through the Audio component. You can import MP3 or WAV files, control volume, sync with animations, and loop audio tracks. The documentation includes examples for audio playback and waveform visualization. Future learning goals in this project include audio synchronization with motion graphics.
9. Is this project suitable for complete beginners to coding?
This project assumes basic coding knowledge but is accessible to motivated beginners. The tutorial provides step-by-step instructions for setup, installation, and component creation. Claude Code helps bridge knowledge gaps by generating code from natural language. If you have never written code before, consider learning React basics first through free online resources.
10. What are the system requirements for running Remotion?
You need Node.js version 16 or higher, a modern web browser for Remotion Studio, and at least 4GB of RAM. Rendering video is CPU-intensive, so a multi-core processor significantly speeds up exports. The project runs on Windows, macOS, and Linux operating systems. Disk space requirements depend on video asset sizes.
11. Can I overlay multiple graphics on video footage simultaneously?
Yes, Remotion supports unlimited layers through component composition. You can stack TitleCards, LowerThirds, diagrams, and other graphics using React’s component hierarchy. The Sequence component controls timing, while positioning properties determine visual layering. This allows complex compositions with many elements appearing and disappearing at different times.
TLDR: Learn how to use Claude Code and Remotion to build programmatic motion graphics. Master AI-powered video editing and skip manual keyframes.
Github:
https://github.com/balarabetahir/-Build-AI-Motion-Graphics-with-Claude-and-Remotion
A few years ago if I wanted to add motion graphics to a video I had two options. I could learn After Effects and spend hours dragging keyframes around. Or I could pay someone else to do it. Both options were slow and expensive.
This is changing. I recently built a system that generates animated lower thirds, title cards, and diagram animations using Remotion and Claude Code. It took me about two hours. The output looks professional and is completely reusable.
This matters because video is becoming the default medium for communication. More people watch video than read articles. More companies explain their products with video than with text. The demand for video content is growing faster than the supply of video editors.
If I can generate motion graphics from code I have a real advantage. I can iterate faster. I can maintain consistency across hundreds of videos. I can make changes by editing a single file instead of rebuilding everything from scratch.
Let me show you how this works.
The Core Idea
Remotion is a library that lets me create videos using React components. Instead of using a timeline and keyframes I write code. My video is a function of time.
This is a different way of thinking about video. In After Effects I work visually. I move objects around and set keyframes at specific points. In Remotion I work mathematically. I define how each element should change as frames progress.
The real power comes when I combine Remotion with an AI coding assistant. Claude Code can read my project files and write new components based on natural language descriptions. I say “create a lower third with my name sliding in from the left” and it writes the React code.
This means I can build complex motion graphics without knowing every detail of the Remotion API. I describe what I want. The AI translates my description into working code. I preview it instantly. I refine it with more prompts.
The cycle is fast. Much faster than manual editing.
Setting Up My Environment
Getting the environment working was the first hurdle. It was mechanical but important. If my tooling was broken I would waste time debugging instead of building.
What I Needed to Install
Node.js. This is the runtime that powers Remotion and all its dependencies. I verified the installation by checking the version in my terminal.
Claude Code. This is the AI coding agent that generates my video compositions from natural language prompts. I signed in with my Claude account to activate the tool.
A Remotion project. I used the scaffold tool to generate a project with everything pre-configured. This included TailwindCSS for styling and Agent Skills for AI assistance.
The scaffold command created a project structure that worked out of the box. It installed all dependencies and configured the development environment. Getting this right saved me from troubleshooting later when I was deep into coding animations.
Verifying My Tools
Once everything was installed I confirmed it worked. I ran Claude Code in my terminal and checked the available commands. I saw:
/help to show available commands
/clear to clear the conversation
/exit to quit Claude Code
/compact to summarize the chat context
When these commands responded properly I knew the tool was ready. I moved on to building actual animations.
Launching Remotion Studio
Remotion Studio is my preview environment. It runs in my browser and updates in real time as I change code. I can scrub through frames and see exactly how my animations look.
To start working I needed to:
Launch Remotion Studio from my project directory
Start Claude Code inside the same directory so it could read my project files
Open the browser preview at the localhost address Remotion provided
This setup gave me a complete development environment. I wrote code. The preview updated instantly. I iterated on designs without rendering videos to check my work.
The immediate feedback loop was crucial. It made iteration feel more like coding a website than editing a video.
Building My First Animated Lower Third
The best way to learn is to build something real. I started with a lower third graphic. This is a common element in videos that shows a person’s name and title.
What I Asked Claude Code
I opened Claude Code in my project directory. I gave it a prompt like this:
“Create an animated lower third component called LowerThird that displays my name with my job title below it. Use a slide in from the left with a colored accent bar. Add a smooth fade in. Use the Inter font. The composition should be 1920x1080 at 30fps for 120 frames.”
What Claude Code Generated
The AI wrote a React component that used Remotion’s core primitives:
useCurrentFrame to track which frame is rendering
interpolate to map frame numbers to animation values
Spring-based easing for smooth motion
It created the component file, wrote the animation logic, and registered it in my project as a Composition. I previewed it instantly in Remotion Studio. I saw my name and title sliding in smoothly.
Iterating on the Design
When I wanted changes, I gave follow-up prompts:
“Make the slide in faster”
“Change the accent bar to gold”
“Add a shadow behind the text”
Claude Code updated the code. The preview updated. I saw the results immediately. This was much faster than dragging keyframes around in After Effects.
Creating a Reusable Design System
Once I had one component working I thought about consistency. I did not want to hardcode colors and fonts in every component. That leads to duplication and maintenance headaches.
The Theme File Approach
I created a centralized theme config file. I stored all my design decisions in one place:
Colors for backgrounds, text, and accents
Font families and sizes
Animation timing values like duration and easing
This file became the single source of truth for my entire video project.
Building Components That Use the Theme
I asked Claude Code to create components that read from this theme file. For example:
A TitleCard component for main titles
A LowerThird component for name and title graphics
Any other overlay I needed
Each component imported the theme values. When I wanted to change the look of my entire project I edited one file and everything updated.
Testing the Design System
I tried changing my theme dramatically. I switched from dark mode to light mode. I changed the primary color. I swapped the font.
Both components updated instantly in Remotion Studio. The lower third now had a warm cream background with a gold accent bar. The title card displayed the same styling with the new serif font.
This confirmed that the design system worked. I never had to update components individually again.
Overlaying Graphics on Real Video
My motion graphics were no good if they only worked on blank backgrounds. I needed to layer them on real footage.
Using the Sequence Component
Remotion provides a Sequence component that controls when other components appear. I wrapped my graphics in Sequence and specified:
A frame offset for when they start
A duration for how long they stay visible
This let me orchestrate exactly when each graphic appeared over my video.
Building a Layered Composition
I created a composition that combined:
My video footage using Remotion’s OffthreadVideo component
My TitleCard appearing first
My LowerThird sliding in a few seconds later
I set the frame timings precisely. The title card showed for the first three seconds. The lower third slid in after a short gap. Each graphic appeared and disappeared at the right moment.
Previewing and Refining
I watched the layered composition in Remotion Studio. I saw how the graphics interacted with the video background. I adjusted timing and positioning with follow-up prompts.
This step proved that my design system worked in a real production context. I could control when each graphic appeared, how long it stayed on screen, and where it sat over the footage.
Adding Animated Diagrams
Text overlays are useful but limited. I wanted to do more with animated diagrams that explain processes and concepts.
What I Could Build
Claude Code could generate diagram components with:
Nodes that appear sequentially with scale and opacity animations
Connections that draw themselves over time using SVG paths
Images inside each node for visual engagement
Color schemes that match my theme
A Real Example
I asked Claude Code to create a diagram showing a pizza order process:
Order Placed
Kitchen Prepares
Oven Bakes
Delivery
It generated a React component with:
Each node appearing one at a time from left to right
Arrows drawing between nodes using animated strokeDashoffset
Theme colors for node backgrounds and text
Smooth easing curves for entrance animations
The diagram played through step by step in Remotion Studio with perfect timing.
Overlaying Diagrams on Video
I layered these animated diagrams on top of real footage using the same Sequence technique. This created explainer-style content where diagrams appeared over live action or screen recorded footage.
The timing mattered. The video continued playing while the diagram animated in. The result was a professional-looking educational video that would have taken hours to edit manually.
Advanced Techniques I Used
Split Screen Transitions
I created a sophisticated transition where the video split to reveal new content. Here is how it worked:
The video started full screen for the first five seconds
At the five second mark the video smoothly animated down to the bottom two thirds
A clean dark background revealed in the top third
My diagram animation started playing in the revealed space
The transition used an ease-out curve over 15 frames. I calculated the final position precisely so the proportions looked balanced.
Anchoring Graphics to Moving Video
When my video moved during the transition my overlays needed to move with it. If the TitleCard stayed fixed while the video slid down it would look wrong.
Get Tahir’s stories in your inbox
Join Medium for free to get updates from this writer.
Subscribe
Remember me for faster sign in
Remotion let me position graphics relative to the video frame. I animated the video position and the overlay positions together. This kept everything aligned properly.
Fine-Tuning Motion Curves
Small adjustments in easing curves made a big difference in perceived quality. A transition that was too abrupt felt jarring. One that was too slow felt sluggish.
The AI generated different curve options. I previewed each one. I picked the one that felt right. This was faster than adjusting bezier handles manually.
Rendering the Final Video
When my composition was ready I exported it as a standalone video file.
The Render Process
Remotion provided a render pipeline that:
Processed every frame of my composition
Rendered video footage, graphics, and animations
Stitched everything together into a single MP4 file
I rendered from the Remotion Studio interface. The default settings worked well for my project.
What I Got
The rendered file was a standard MP4 with H.264 encoding. It played in any video player. I could upload it to YouTube or social media. I could use it in a real video production workflow.
The overlays were baked into the video. No external files needed. The video played correctly with all graphics intact.
Key Concepts I Learned
Frame-Based Animation
Everything in Remotion is driven by frames. At 30 frames per second, 120 frames is four seconds. I defined animations in terms of frame numbers.
This precision gave me fine control. I could place events within 33 millisecond increments. This was tighter than most manual editors can achieve.
The Power of Interpolation
interpolate maps frame numbers to values. I used it for:
Position changes from left to right
Opacity changes from transparent to solid
Scale changes from small to large
Color changes from one value to another
These simple building blocks combined to create complex animations.
Component Reusability
React components are reusable by nature. Once I built a LowerThird component I could use it anywhere. I could import it into other projects. I could share it with team members.
This was different from After Effects where each project starts from scratch.
AI-Assisted Iteration
The real breakthrough was iteration speed. I described what I wanted in natural language. The AI wrote the code. I previewed it. I refined it with more prompts.
This let me experiment freely. I tried a different animation style. I tested a new color scheme. I explored a layout option. The cost of each experiment was minutes instead of hours.
What This Enables Me to Do
Personalization at Scale
Now that I have a code-based video system I can generate personalized versions. I can change the name in the lower third for each recipient. I can update the data in the diagram for each viewer. I can render hundreds of videos automatically.
This is impossible with manual editing. The cost per video would be too high. With code-based tools the marginal cost is near zero.
Rapid Updates
When information changes my videos can change with it. I update the theme file and all my graphics update. I change the diagram data and the animation updates. I render a new version in minutes.
This is valuable for training content, product demos, and any video that needs to stay current.
Integration with Data Sources
I can feed data into my video generation pipeline. I can read from a spreadsheet. I can query an API. I can pull from a database. The video builds itself from the data.
Imagine generating a monthly report video with updated charts and graphs. The system renders it automatically. I never touch the animation code.
What This Does Not Replace
This approach is not a replacement for professional video editing in all cases.
Complex visual effects are still easier to create in dedicated tools. Organic motion that requires artistic judgment is hard to specify in code. The AI can generate simple animations but it cannot match the intuition of an experienced animator.
The current tools have rough edges. Rendering can be slow for long videos. Debugging animation timing can be confusing. The AI sometimes generates code with small mistakes that I need to fix.
But these limitations are shrinking. The tools are improving. The AI models are getting better. The gap between code-based and manual video editing is smaller than it was a year ago and will be smaller still next year.
What I Learned Doing This Project
The whole project took about two to three hours from start to finish. The most challenging part was getting the split screen transition timing exactly right. I had to iterate on the ease-out curve and the final position offset to make the motion feel natural.
Another tricky moment was making sure the TitleCard and LowerThird stayed anchored to the video as it moved down. The coordinates needed to be relative to the video frame, not the full screen.
Once I described what I wanted clearly to Claude Code it handled the coding quickly. I just focused on previewing and refining the feel.
The project taught me:
How to build a reusable motion graphics system with code
How to centralize design decisions in a theme config
How to use AI assistance to generate and iterate on animations
How to layer graphics on video with precise timing
How to create animated diagrams and transitions
My Next Steps
If you create video content you should learn these tools. The time investment is modest. The payoff is substantial.
Start small. Build one animated overlay. Use it in one video. See how it compares to your current workflow. Then expand from there.
The real long-term value is optionality. Once you have a code-based system you can do things that are hard with manual tools. You can generate multiple versions. You can personalize for different audiences. You can integrate with data sources.
Video is not going away. The demand for it is increasing. The people who can produce high-quality video efficiently will have an advantage.
Code-based motion graphics is the lever. I pulled it. You should too.
Github:
https://github.com/balarabetahir/-Build-AI-Motion-Graphics-with-Claude-and-Remotion
Further Reading:
🌉 Bidirectional Design to Code via Paper and Claude Code MCP
🤖AI-Powered Project Management with Linear and Claude MCP
Defense-in-Depth Multi-Layer Security Guardrails for Claude Code
🤖Automating Git Workflows with Claude Code Skills
🤖 Building a Portfolio with Claude Code
🎧 Build a Spotify Clone Database With Cursor and Supabase MCP
🤖Building Spotify Clone Features with Claude Code
Build a Spotify Clone with Cursor
Automate AI Second Brain(LLM Wiki Pattern) With Claude Code and Obsidian
Build an AI Second Brain(LLM Wiki Pattern) With Claude Code and Obsidian
🛡️Building an AI-Powered Python Security Scanner with Gemini
Architecting Autonomous Deep Research Agents with LangGraph
How to Ship a Landing Page with v0 and Vercel
Build a Telegram AI Bot with 🦞OpenClaw + Anthropic API
Engineering Persistent Memory and Personality in OpenClaw 🦞
Automate Your Daily AI News with OpenClaw 🦞
🤖Building a Local Multi-User RAG API with FastAPI
Part 1: Building AI Data Governance
Part 2: Building The HR Agent
Part 3: Evaluating and Deploying the HR Analytics Agent
Build AI Customer Support Agents with PydanticAI
Frequently Asked Questions (FAQ)
Video Editing with Claude x Remotion
1. What is Remotion and how does it work for video editing?
Remotion is a React-based framework that lets you create videos using code. Instead of dragging keyframes in traditional editors, you write components that define every frame of your animation. Each frame renders like a React component, giving you precise control over motion, timing, and visual elements. Remotion Studio provides a real-time preview where you can scrub through frames instantly.
2. Do I need to know React to use Remotion effectively?
Yes, basic React knowledge is essential. You need to understand components, hooks like useState and useEffect, and how props work. Remotion extends React with video-specific hooks like useCurrentFrame and useVideoConfig. If you are new to React, the learning curve is manageable with basic tutorials. Claude Code can help generate components, but understanding the code structure helps with troubleshooting.
3. What is Claude Code and how does it help with video editing?
Claude Code is an AI coding assistant that generates, modifies, and improves code through natural language prompts. You describe what you want to build, and Claude writes the React component code for you. For video editing, this means you can say “create an animated lower third with a slide-in effect” and Claude generates the full Remotion component with proper interpolation and timing logic.
4. Is Claude Code free to use?
Claude Code requires an active Claude subscription. Pricing varies based on usage and plan tier. The tool offers a sign-in process that activates the AI capabilities. Check the official Anthropic website for current pricing details and free trial availability.
5. Can I use Remotion for professional video production?
Absolutely. Remotion is used by companies for marketing videos, social media content, presentations, and automated video generation. The code-based approach enables consistent branding, version control, and automated rendering pipelines. Many professionals prefer it for projects requiring precise timing and repeatable results.
6. How long does it take to render a video in Remotion?
Render time depends on video length, resolution, frame rate, and effects complexity. A 10-second 1080p video typically renders in 30–60 seconds on a modern machine. Longer videos with complex animations or multiple video layers may take several minutes. Remotion Studio provides a render button that processes frames sequentially and shows progress updates.
7. What video formats does Remotion support for export?
Remotion primarily exports MP4 files using H.264 codec, which is widely compatible with YouTube, social media, and most video players. You can also export WebM format for web use and image sequences for specialized workflows. The render settings let you configure codec, resolution, and frame rate options.
8. Can I add my own music or audio to Remotion videos?
Yes, Remotion supports audio through the Audio component. You can import MP3 or WAV files, control volume, sync with animations, and loop audio tracks. The documentation includes examples for audio playback and waveform visualization. Future learning goals in this project include audio synchronization with motion graphics.
9. Is this project suitable for complete beginners to coding?
This project assumes basic coding knowledge but is accessible to motivated beginners. The tutorial provides step-by-step instructions for setup, installation, and component creation. Claude Code helps bridge knowledge gaps by generating code from natural language. If you have never written code before, consider learning React basics first through free online resources.
10. What are the system requirements for running Remotion?
You need Node.js version 16 or higher, a modern web browser for Remotion Studio, and at least 4GB of RAM. Rendering video is CPU-intensive, so a multi-core processor significantly speeds up exports. The project runs on Windows, macOS, and Linux operating systems. Disk space requirements depend on video asset sizes.
11. Can I overlay multiple graphics on video footage simultaneously?
Yes, Remotion supports unlimited layers through component composition. You can stack TitleCards, LowerThirds, diagrams, and other graphics using React’s component hierarchy. The Sequence component controls timing, while positioning properties determine visual layering. This allows complex compositions with many elements appearing and disappearing at different times.


| 2,000 mlx | |
| 5 | |
| 0 |