#earn #train #pencil #art How about earning some millix…

40 reactions
#earn #train #pencil #art
How about earning some millix?
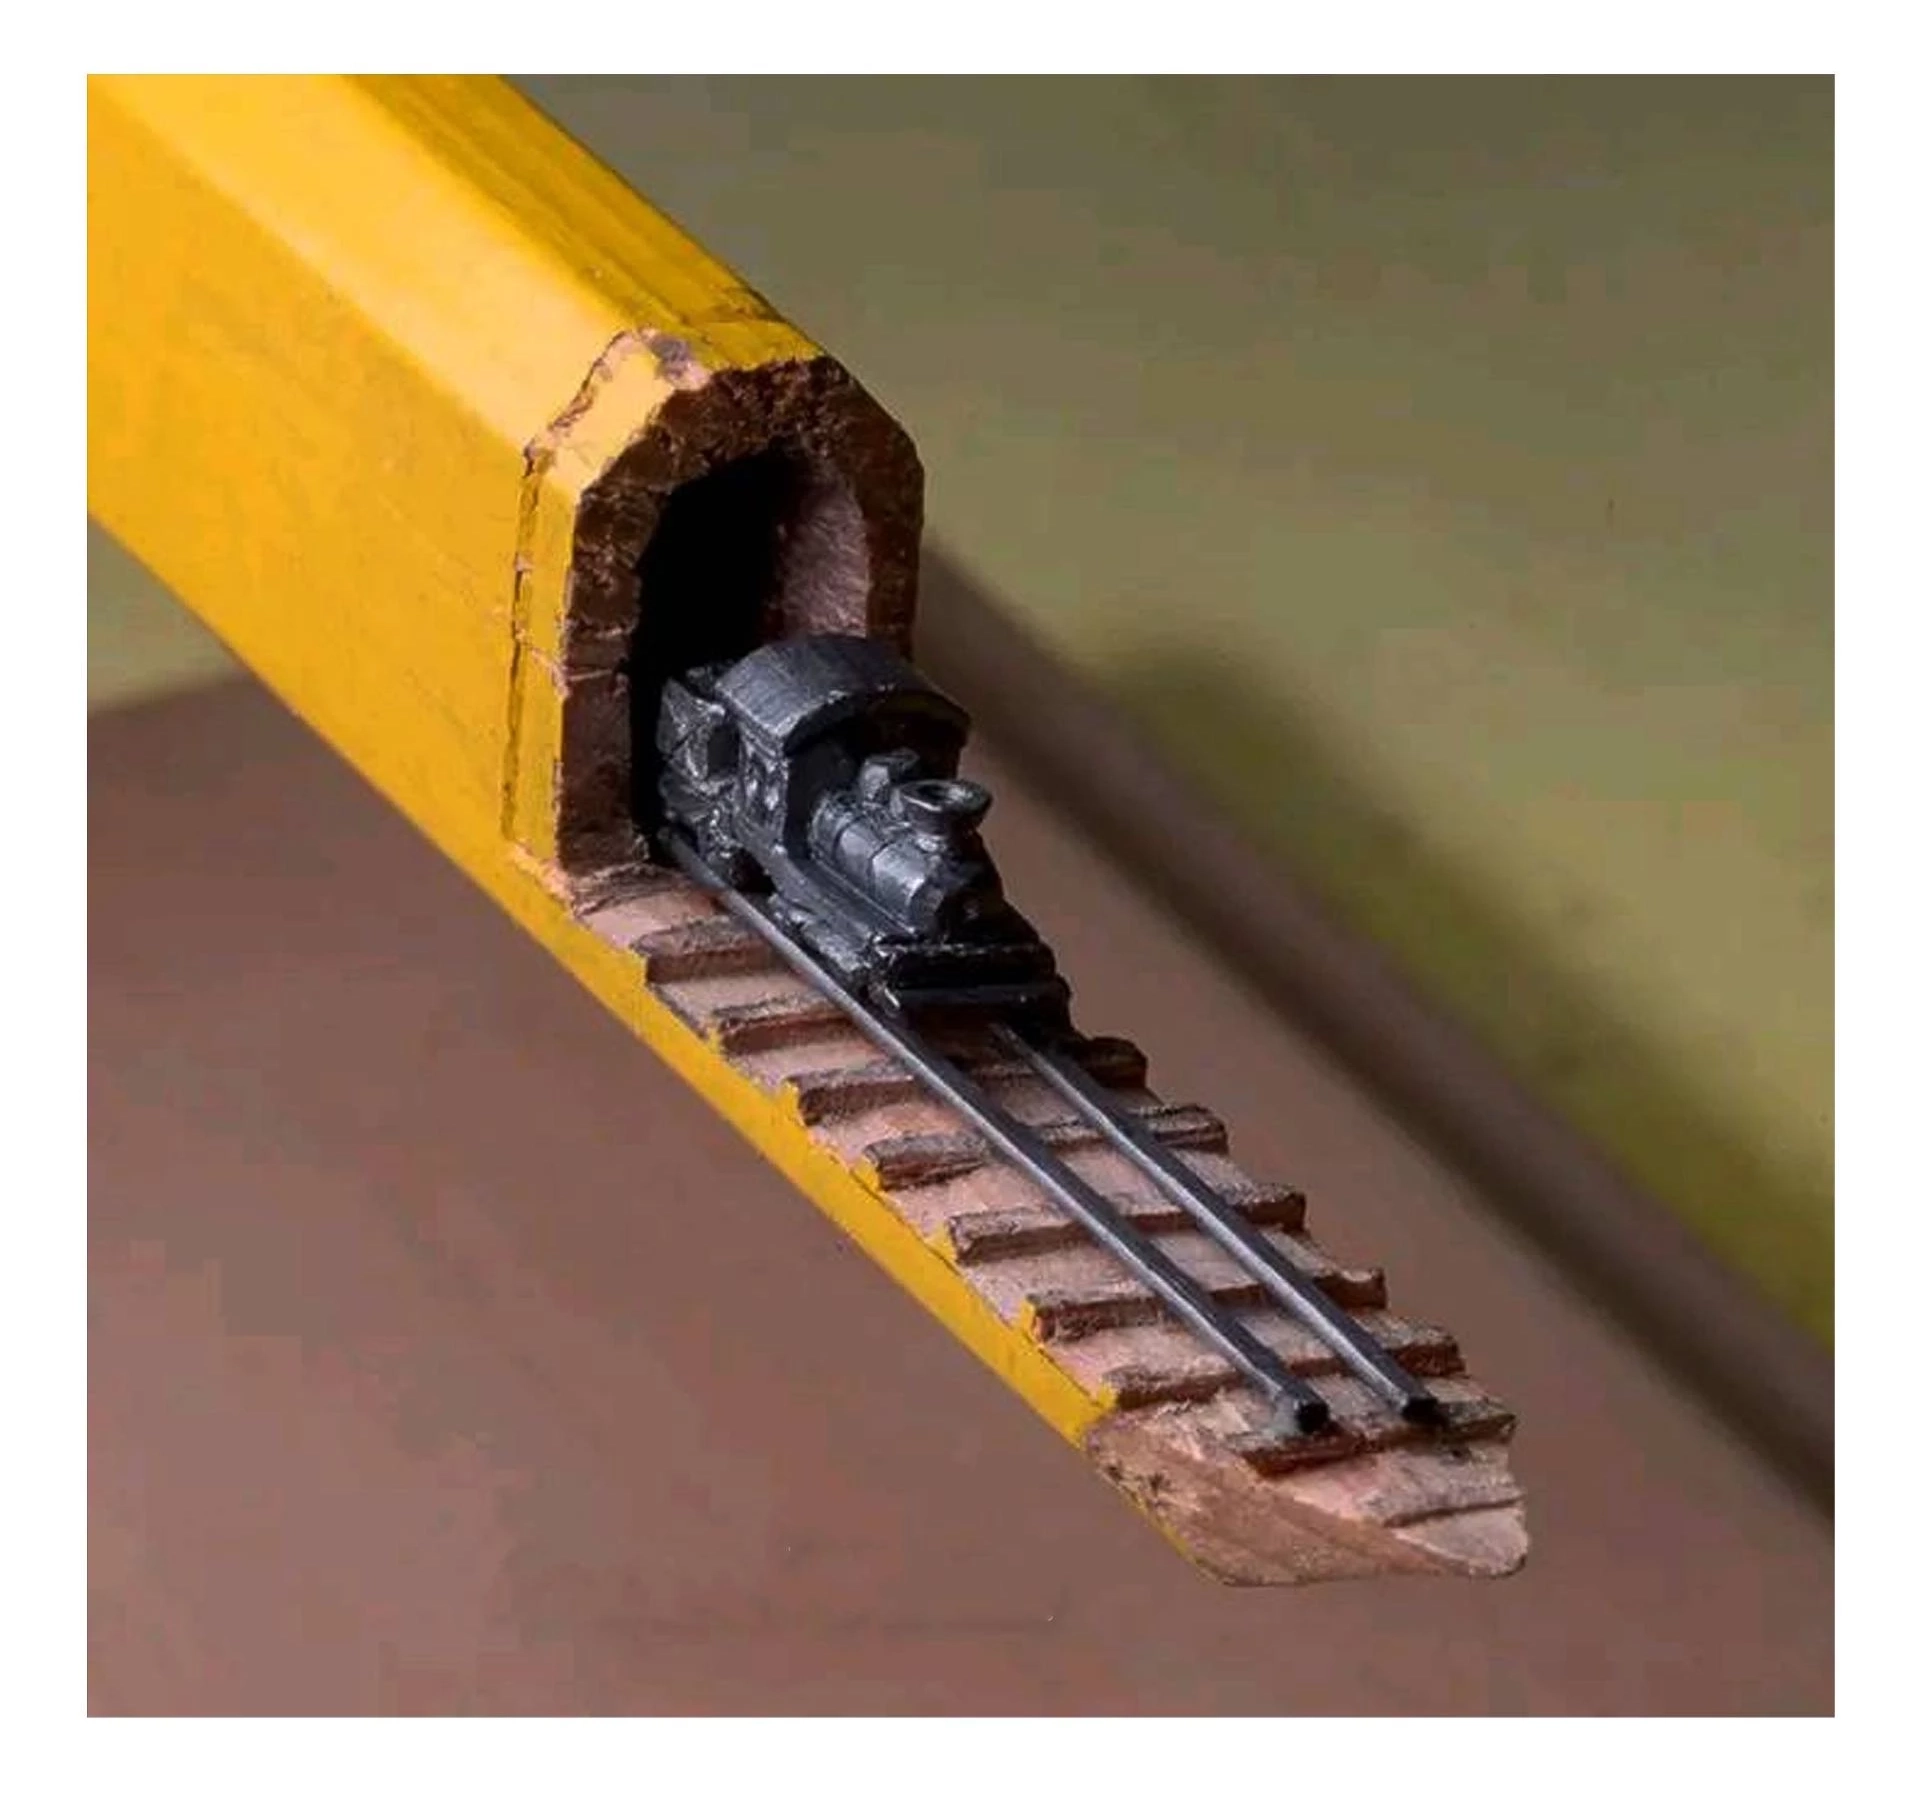
Describe the steps the artist took and the tools used to create this miniature railroad with the steam engine.
Your entry must be original -- no duplicate descriptions will be awarded millix.
First place: 2,000,000 millix
Second place: 1,000,000 millix
Contest ends March 1, at 01:00 UTC
Cheers, Susan ❤️😀
How about earning some millix?
Describe the steps the artist took and the tools used to create this miniature railroad with the steam engine.
Your entry must be original -- no duplicate descriptions will be awarded millix.
First place: 2,000,000 millix
Second place: 1,000,000 millix
Contest ends March 1, at 01:00 UTC
Cheers, Susan ❤️😀


22

5

1
| 4,234,000 mlx | |
| 109 | |
| 40 |
comments

It all started with freeing up the graphite.
It used to the pressure beneath, but the wood was another matter. This step was the most important.
A deep breath - so much better. Now, as the light shines at the end of the tunnel calm is the most important tool. And silent patience. Blades and sandpaper helps, but focus on the rails and keep adding the graphite to the final destination.
Steam erupts into forms. Vision into focus.
We are on rails ... good speed!
No matter if we arrive or not, every step of the journey is the art itself.
Godspeed!
It used to the pressure beneath, but the wood was another matter. This step was the most important.
A deep breath - so much better. Now, as the light shines at the end of the tunnel calm is the most important tool. And silent patience. Blades and sandpaper helps, but focus on the rails and keep adding the graphite to the final destination.
Steam erupts into forms. Vision into focus.
We are on rails ... good speed!
No matter if we arrive or not, every step of the journey is the art itself.
Godspeed!


i believe that this artist was just sharpening his pencil to use for sketching or whatever writing or drawing til he ended up making this great beautiful mini sculpture out of his pencil.
First things first, he gotta remove the outer wood part of the pencil (from middle to top) until the dark color mid part (lead) shows up, but very very careful to avoid the mid part (black color) getting damaged not (mongol brand) pencil but there are some rectangular shape of pencil usually used by some people in line of architecture . as we can see the train itself and the railway is the mid part of the pencil.
Second things second, after finally removing the outer wood part (middle to top only to show the lead part(black color)then here is the hardest part of 'em all which the super skills of artist will come out. He started curving , scraping and any ways of reshaping the lead or mid part of the pencil in order to become as beautiful as train and railway same as we see on the photo.
Last things last, polishing moment of the artist , still needs some serious touch (i mean still must be very gentle to avoid damaging the train )until his eyes gets finally satisfied and declare it as "finished Product". What a wonderful creation of this amazing artist. Superb job!
First things first, he gotta remove the outer wood part of the pencil (from middle to top) until the dark color mid part (lead) shows up, but very very careful to avoid the mid part (black color) getting damaged not (mongol brand) pencil but there are some rectangular shape of pencil usually used by some people in line of architecture . as we can see the train itself and the railway is the mid part of the pencil.
Second things second, after finally removing the outer wood part (middle to top only to show the lead part(black color)then here is the hardest part of 'em all which the super skills of artist will come out. He started curving , scraping and any ways of reshaping the lead or mid part of the pencil in order to become as beautiful as train and railway same as we see on the photo.
Last things last, polishing moment of the artist , still needs some serious touch (i mean still must be very gentle to avoid damaging the train )until his eyes gets finally satisfied and declare it as "finished Product". What a wonderful creation of this amazing artist. Superb job!
Hi, aryunahosogh--you are the winner
because you realized the pencil might be used by a professional architect or carpenter -- carpenter was right. The lead of a carpenter's pencil is square as is the pencil itself, not round. Creator is Cindy D. Chinn. Check out her website: www.cindychinn.com
Congratulations❗
because you realized the pencil might be used by a professional architect or carpenter -- carpenter was right. The lead of a carpenter's pencil is square as is the pencil itself, not round. Creator is Cindy D. Chinn. Check out her website: www.cindychinn.com
Congratulations❗
1
OMG! Madam Susan, my gratitude and i am so honored, i knew that there is kind of pencil bcuz when i was so young my father is a carpenter and used to ask me to assist him in making our house's roof so i was kinda familiar about the shape of that pencil which is kinda square or rectangular he was using and sometimes he put on his ears. kinda wondering why its a different shape not round . million thanks again Madam
i believe this artist was just sharpening hi pencil to use for sketching or whatever wrining til he ended up maki this great sculpture out of his pencil. not mongol pencil but there are some rectangular shape of pencil usually used by some people in line of architecture . as we can see the train itself and the railway is the mid part of the pencil. what an amazing for this artist. superb!!!
The image you posted shows a miniature railroad carved from the lead of a pencil. It is difficult to say for sure exactly how the artist created this piece, but it is likely that they used a variety of small, sharp tools, such as knives, scalpels, and sandpaper.
They would have first needed to sharpen the pencil to a very fine point. Then, they would have carefully carved the train, tracks, and other details from the lead. This would have required a great deal of patience and precision, as the lead is a very delicate material. Finally, the artist may have used sandpaper to smooth out any rough edges.
This is only my opinion hehe
They would have first needed to sharpen the pencil to a very fine point. Then, they would have carefully carved the train, tracks, and other details from the lead. This would have required a great deal of patience and precision, as the lead is a very delicate material. Finally, the artist may have used sandpaper to smooth out any rough edges.
This is only my opinion hehe

Hello 🤗
That's so creative art.
The artist used X-Acto knife and magnifying glass. Started with another pencil and etched a 3/16 inch-tall train out of its lead. After that with a second pencil, artist fashioned a passageway and partial tracks. Then glued straight lead pieces onto it and secured the locomotive to them.
That's so creative art.
The artist used X-Acto knife and magnifying glass. Started with another pencil and etched a 3/16 inch-tall train out of its lead. After that with a second pencil, artist fashioned a passageway and partial tracks. Then glued straight lead pieces onto it and secured the locomotive to them.
1. Know the desired end result.
2. Assemble the required tools... craft knives and blades, miniature chisels, , miniature drill, eye loupe magnifier, etc.
3. Remove the wood with blades to expose the graphite.
4. Cut away wood to create the tunnel and the sleepers.
5. Sculpt the graphite for the rails and engine.
6. Patience.
2. Assemble the required tools... craft knives and blades, miniature chisels, , miniature drill, eye loupe magnifier, etc.
3. Remove the wood with blades to expose the graphite.
4. Cut away wood to create the tunnel and the sleepers.
5. Sculpt the graphite for the rails and engine.
6. Patience.
1
1
Thank you. I had no idea that a "carpenter's pencil" existed. After you pointed out the shape, I noticed. I learn every day.

I would say, the artists used an exacto-knife and/or small chisel to remove the excess wood, then used dental type tools to carve out the 'lead'.