Triple Raspberry Entremet Triple Berry Entremet Notes…
0 reactions
Triple Raspberry Entremet
Triple Berry Entremet
Notes:
\*\*\*This will be a multi-day process, as the mousse layer needs to freeze overnight.
You will need a round silicone entremet mold for this recipe. This recipe is for a 7.5 x 2 inch round mold. I bought one from Amazon for $8.99 - HYQO Entremet Mold Silicone, 7.5 x 2 In Round. You could also make this in a spring form pan, however you will need to line it quite a bit with plastic wrap and you will need to adjust the size of the layers according to the size of the pan. I have never tried it that way and can't vouch for it.
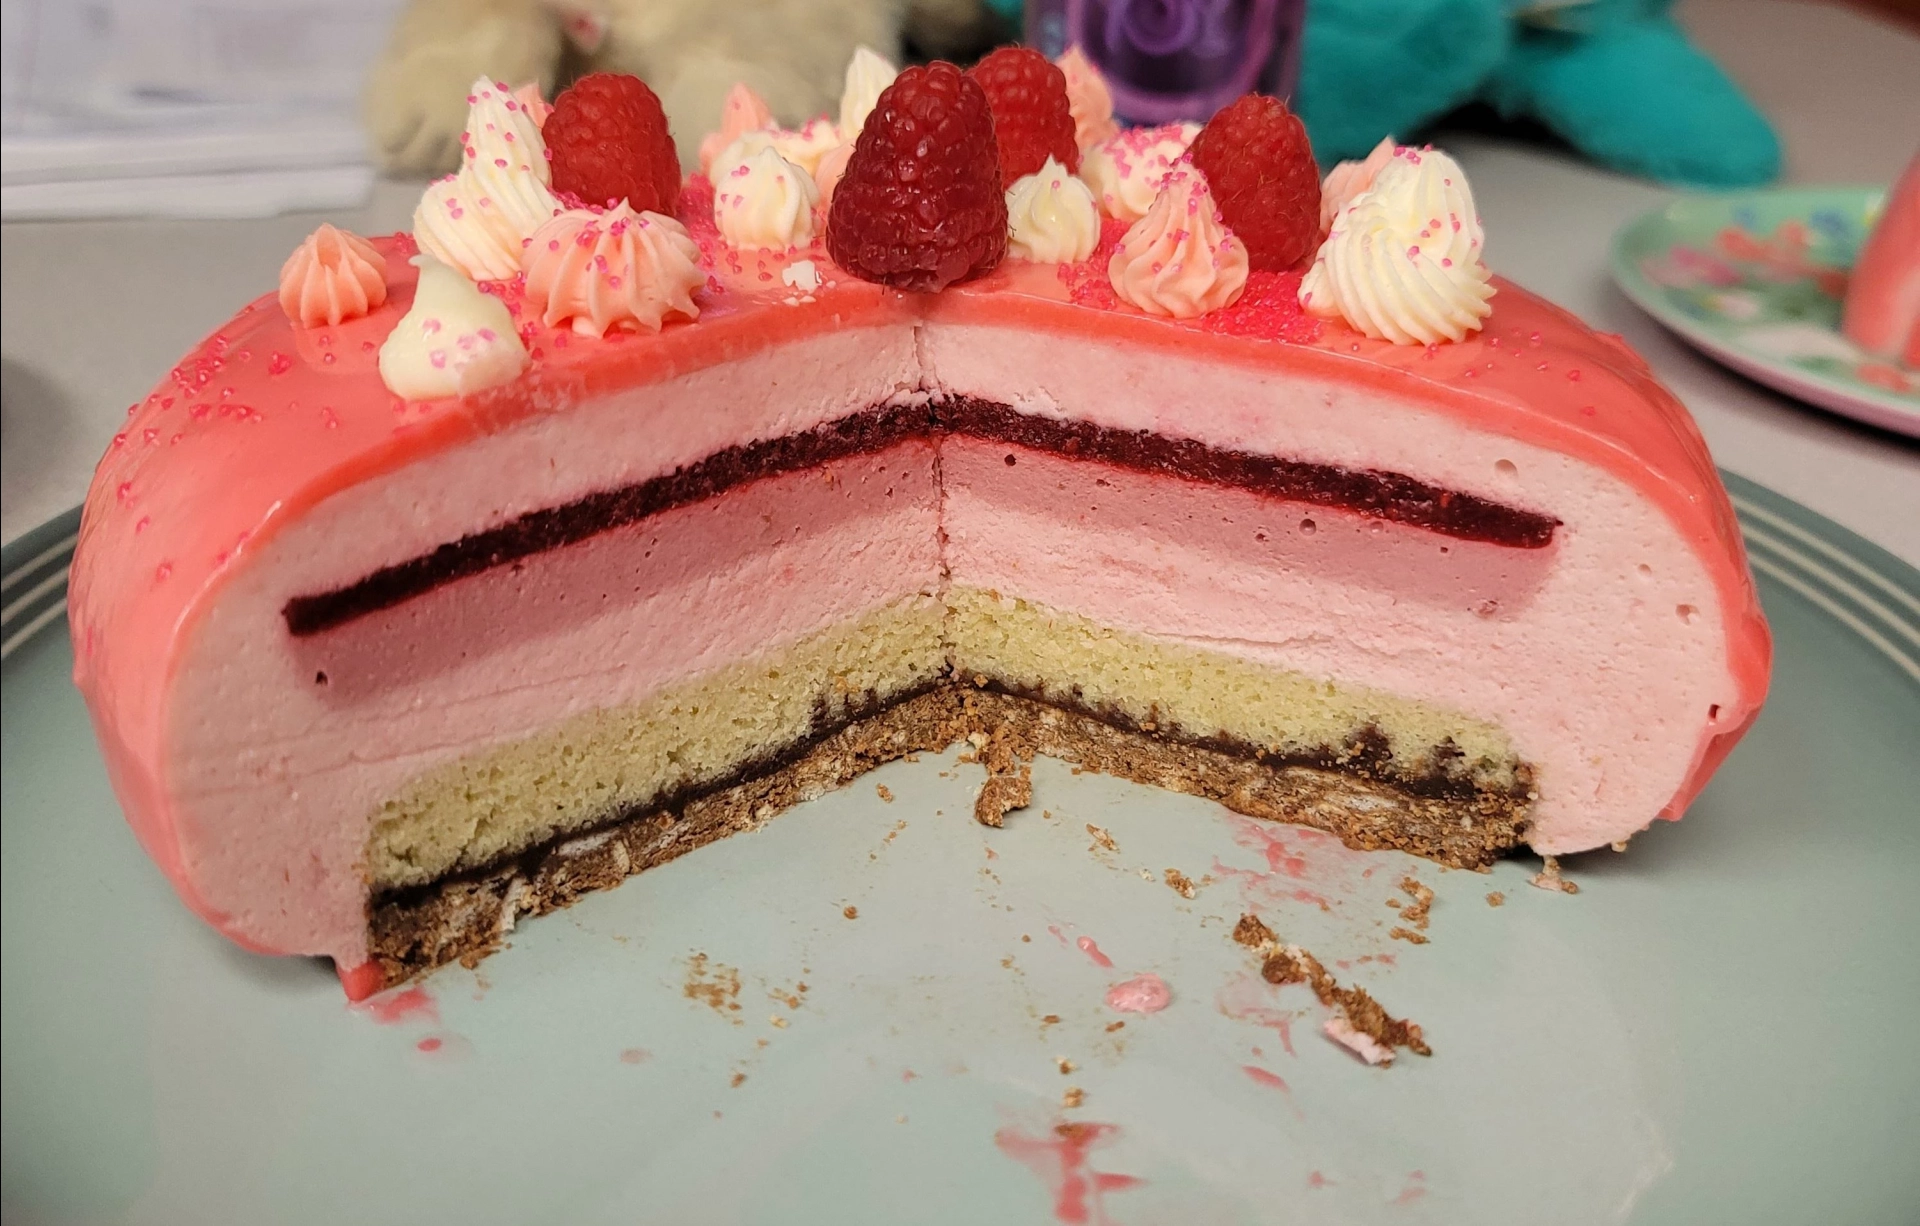
Here are the layers you will be making, in the order they will appear in the cake, from bottom up:
Chocolate graham cracker crunch
Chocolate ganache
Vanilla joconde sponge
Roasted raspberry cremeux
Raspberry gelée
Light raspberry mousse
White chocolate and almond mirror glaze
Chocolate Graham Cracker Crunch:
55 g milk chocolate, finely chopped
35 g feuilletine - recipe for this is all the way at the bottom
30 g graham cracker crumbs
25 g almond praline paste - recipe for this is all the way at the bottom
1 small pinch of salt
1. Crush the graham cracker into fine crumbs.
2. Break the feuilletine into smaller pieces but not tiny crumbs.
3. Melt the milk chocolate until it is smooth, then add the almond praline paste and salt and mix together.
4. Fold in the graham crumbs and feuilletine. It will get quite thick and chunky.
5. Line a 6-inch pan with cling wrap. Press the mixture into the pan and compact it down tightly (you can use the bottom of a glass to press it down). Try to get it as pressed and thin as possible.
6. Freeze for at least a few hours.
Vanilla Joconde Sponge:
1 large egg (about 50 g)
30 g almond flour
30 g powdered sugar
12 g all-purpose flour
1 large egg white (about 30 g)
8 g granulated sugar
10 g unsalted butter, melted and cooled
1 tsp vanilla bean paste, or ¾ tsp vanilla extract
Pinch of salt
1. Heat oven to 400°F (200°C).
2. Line the bottom of a 6-inch pan with a round of parchment paper.
3. Whisk the whole egg, almond flour, powdered sugar, vanilla, and salt for about 2–3 minutes, until noticeably lighter and slightly foamy.
4. Sift in the all-purpose flour and gently incorporate it.
5. Whip the egg white until foamy. Gradually add the 8 g granulated sugar.
6. Continue whipping until you have glossy medium-firm peaks. Don't take it all the way to a very stiff meringue.
7. Fold about ⅓ of the whipped egg white into the egg mixture to lighten it. Fold in another ⅓, then the final ⅓, being gentle so you don't lose too much air.
8. Take a small spoonful of the batter and mix it thoroughly into the melted butter. Fold that butter mixture back into the batter.
9. Spread the batter evenly in the 6-inch pan and bake for 6-8 minutes, until the top is just barely golden and springy to the touch.
10. Cool completely, then wrap tightly in plastic and freeze for a few hours.
11. Once frozen, unwrap the sponge and shave down either the top or bottom so that the layer is very thin - no more than 1/2 inch tall. You can do this right before attaching it to the crunch layer.
Chocolate Ganache:
\*\*\*Don't make this layer until the sponge layer and the crunch layer are fully frozen and ready for assembly.
25 g dark chocolate, about 60–65%, finely chopped
15 g heavy cream
4 g glucose syrup or light corn syrup
2 g unsalted butter
1/2 tsp vanilla paste
Tiny pinch of salt
1. Put the chopped chocolate in a small bowl.
2. Heat the heavy cream and glucose until steaming hot but not boiling.
3. Pour over the chocolate and let sit for about 1 minute.
4. Stir slowly from the center outward until completely smooth and glossy.
5. Stir in the butter, salt, and vanilla.
6. Let it cool until it thickens to a soft, spreadable consistency.
Assemble the crunch and sponge layers:
Keep the crunch layer in it's pan. Spread the chocolate ganache evenly over the crunch layer. Lay the sponge layer on top of the ganache and press down firmly and evenly on the sponge layer, so that it fully sticks to the ganache and crunch layer. Don't be afraid to evenly squish down the sponge layer a little (but don't make it lumpy). You should now have a crunch layer, ganache layer, and sponge layer all in one pan. Tightly wrap the pan and freeze.
Roasted Raspberry Crèmeux:
\*\*\*Make this layer before the gelee layer, as you will be pouring the gelee onto the frozen crèmeux layer.
150 g raspberries — fresh or frozen
15 g pure maple syrup
5 g lemon juice
1 large egg yolk — about 18 g
20 g granulated sugar
2 g powdered gelatin
10 g cold water, for blooming the gelatin
35 g heavy cream
25 g unsalted butter, softened
Tiny pinch of salt
½ tsp vanilla bean paste
Red food coloring
1. Heat your oven to 350°F (175°C).
2. Put raspberries in a small oven-safe dish and drizzle with the maple syrup.
3. Roast for approximately 20–30 minutes, stirring once or twice. You want the raspberries to collapse and become darker and more concentrated.
4. Cool roasted raspberries, then blend. Pass the purée through fine-mesh sieve to remove the seeds.
5. Stir lemon juice into the purée.
6. Sprinkle the 2 g powdered gelatin over the 10 g cold water. Let it sit for 5–10 minutes.
7. Whisk together the egg yolk, sugar, roasted raspberry purée, and cream.
8. Pour into a saucepan and cook over low to medium-low heat, stirring constantly, until it reaches approximately 180°F (82°C). Don't let it boil!
9. Once thickened to a custard, remove from heat. If need be, strain out any chunks.
10. Add the bloomed gelatin until fully dissolved.
11. Add softened butter, vanilla, and salt. Blend with an immersion blender until completely smooth and glossy. Try to keep immersion blender submerged to avoid making bubbles. Add a few drops of the red food coloring.
12. Pour into a 6-inch pan lined with cling wrap.
13. Wrap the pan and freeze until completely solid, usually a few hours.
Raspberry Gelée:
\*\*\*Make this layer only after the crèmeux is fully frozen.
130 g raspberries, preferably frozen
15 g granulated sugar
5 g fresh lemon juice
2 g powdered gelatin
10 g cold water, for blooming the gelatin
1. Thaw raspberries.
2. Blend raspberries and push purée through fine-mesh sieve to remove seeds.
3. Sprinkle 2 g gelatin over 10 g cold water. Let it sit for 5–10 minutes.
4. Put the raspberry purée and 15 g sugar in a small saucepan.
5. Warm gently until the sugar dissolves and the mixture reaches about 140–160°F. Don't boil.
6. Remove from the heat and stir in the bloomed gelatin until completely dissolved.
7. Stir in lemon juice.
8. Allow to cool, but no enough to solidify. It needs to be pourable.
Assemble gelée and crèmeux layers:
Keep the frozen crèmeux layer in it's pan and gently score the top by making very shallow cut marks. The idea is to rough up the surface a bit so that when you pour on the gelée, it is better able to "grab" onto the crèmeux surface. Once you have scored the top surface, pour the liquid gelée onto the crèmeux layer that is inside the pan. You might need to tilt the pan back and forth a bit to get the gelée to settle evenly. You should now have the crèmeux layer with the gelée on top, all in the same pan. Wrap the pan and freeze until the gelée has completely solidified. Make sure the pan is on a level surface as it freezes.
Light Raspberry Mousse:
340 g fresh raspberries
88 g granulated sugar
10 g powdered gelatin
50 g cold water, for blooming the gelatin
340 g heavy cream
1. Place the fresh raspberries in a saucepan over medium-low heat. Cook gently until they soften and release their juices.
2. Blend raspberries and push purée through fine-mesh sieve to remove seeds.
3. Return the raspberry purée to the saucepan. Add the 88 g sugar and warm gently until the sugar has completely dissolved.
4. Remove from heat and stir in bloomed gelatin until completely dissolved.
5. Transfer mixture to a bowl and cool down to 85–95°F (30–35°C).
6. Whip the heavy cream to soft peaks.
7. Add about 1/3 of the whipped cream to the raspberry mixture and whisk gently to lighten it. Then fold in the remaining whipped cream in two additions.
Assemble the entremet:
The entremet will be assembled upside-down. Take the round entremet mold and put the bottom part (the part without a hole) on a baking sheet or some sort of flat surface that you'll be able to transfer to the freezer, so that the mold remains level as you move it. Pour enough mousse into the mold so that it covers about a 1/2 inch of the bottom. Place the mold in the freezer for no more than ten minutes, checking it frequently. You want the mousse to firm up just enough so that when you place the next layer on top, it won't sink down. Once the mousse has the consistency of slightly-loose pudding, take it out of the freezer. Take the crèmeux-gelée layer and, with the gelée side face down, gently place it into the mold, on top of the slightly-firm mousse layer. Very lightly press it down so that it snuggles into the mousse. Now connect the top part of the mold to the bottom part. You now have the enclosed entremet mold, with a hole at the top. Pour some more mousse into the mold through the hole at the top. The goal is to cover the crèmeux-gelée layer in mousse. Make sure the mousse gets all around the sides of the crèmeux-gelée layer. Pour enough mousse so that the bottom of the crèmeux-gelée layer (that is, the underside of the crèmeux layer since it is placed in the mold upside down) is completely covered, and fill the mold with mousse, leaving an inch from the top hole. Again place the mold in the freezer, this time for no more than 5 minutes. Take it out and place the crunch/sponge layer, sponge side down, through the hole and into the mousse that's in the mold. Gently press the layer into the mousse. You might have a little mousse squeeze out of the top hole as the crunch/sponge layer displaces it. Gently press the sponge/crunch layer into the mousse until the bottom of the crunch layer is flush with the mold opening. Wipe away any excess mousse that might have come out of the mold. Place the mold in the freezer and freeze at least 12 hours. After it has frozen solid, carefully remove from the mold.
White chocolate and almond mirror glaze:
50 g water
75 g granulated sugar
75 g glucose syrup or light corn syrup
100 g white chocolate, finely chopped
20–25 g heavy cream
4.5 g powdered gelatin
22 g cold water, for blooming gelatin
½ tsp vanilla extract
Tiny pinch of salt
Red food coloring
1. Sprinkle the 4.5 g powdered gelatin over the 22 g cold water. Let it sit for 5–10 minutes.
2. Put the chopped white chocolate in a tall, narrow container suitable for an immersion blender.
3. Combine the 50 g water, sugar, and glucose/corn syrup in a saucepan.
4. Heat until the sugar is completely dissolved and bring the syrup to approximately 220–225°F (104–107°C).
5. Remove from heat and stir in heavy cream.
6. Pour the hot mixture over the white chocolate and let it sit for about 1 minute.
7. Add the bloomed gelatin, vanilla, salt, and red coloring.
8. Blend with an immersion blender, keeping the blender head fully submerged to avoid incorporating air. Blend until completely smooth and glossy.
9. Pass the glaze through a fine-mesh sieve as needed.
10. Wait for the glaze to cool down to 85–90°F (30–33°C)
11. Pour the glaze over the center and let it flow naturally over the sides.
Refrigerate the entremet for 1 hour to allow the glaze to set. Defrost the entremets for at least 4 hours in the fridge, then 30 minutes outside the fridge, before serving. Otherwise you run the risk of the gelée being frozen. You can refrigerate the leftovers for a few days. Be sure to use a warm knife when slicing.
Fueilletine:
56 g unsalted butter, room temperature
60 g powdered sugar, sifted
1 large egg, room temperature
60 g all purpose flour
1/4 tsp sea salt (I found this to be a bit much)
1/4 tsp baking soda
14 g molasses
1. Preheat oven to 350°F (177°C).
2. Line two half-sheet baking pans with parchment paper.
3. Cream butter with powdered sugar until smooth.
4. Add egg and beat until combined.
5. Drop 1/4 of the batter onto the prepared baking pan. Use an offset spatula or regular spatula to spread the batter as thin as possible. If you leave even the slightest thick area, it will bake doughy and that spot will be ruined.
6. Bake for 4 to 6 minutes, rotating the pan halfway through. Keep a close eye on it. It's done when there's an even golden brown across the entire surface.
7. Remove from oven and cool on baking sheet for 10-15 minutes. It will crisp up once cooled. Once cooled, break into pieces and store n airtight container.
8. Repeat with the remaining batter. For the recipe above, you only need one pan's worth.
Almond Praline Paste:
\*You will need a food processor for this.
1/2 cup raw sliced almonds
1/2 cup granulate sugar
1/2 Tbsp vegetable oil
1-2 Tbsp water
1. Preheat over to 350°F (177°C).
2. Line a baking sheet with parchment paper.
3. Spread the almond slices out on the baking sheet
4. Bake in the oven in middle rack for 1-2 minutes. Check the almonds and if they are the slightest bit golden, they are done. If not, continue baking in 30 second bursts. They will burn very quickly and easily.
5. Take the almonds out of the oven, leave on the pan and set aside to cool.
6. Place sugar in medium saucepan and add water, just enough to make all of the sugar wet but no more.
7. Set on medium-low heat and don't stir. The sugar will eventually melt, then begin to bubble. The bubbles may look a bit crusty, this is normally. Watch it closely. It will slowly darken in color. As soon as it is a deep golden amber, take it off the heat and quickly pour it over the almonds, using spatula to help it out of the pot. This melted sugar is extremely hot so be careful. Cover the almonds and let the whole thing cool.
8. Once fully cooled, break up the almonds and hardened sugar and place pieces into a food processor.
9. Add oil and blend. It will go through a few stages and different consistencies. You might need to stop and scrape the paste from the edges. After about 4 or 5 minutes, it should look like a fluid paste. If not, keep going. It will get there. You can store this in an airtight container at room temperature.
#drink #food
Triple Berry Entremet
Notes:
\*\*\*This will be a multi-day process, as the mousse layer needs to freeze overnight.
You will need a round silicone entremet mold for this recipe. This recipe is for a 7.5 x 2 inch round mold. I bought one from Amazon for $8.99 - HYQO Entremet Mold Silicone, 7.5 x 2 In Round. You could also make this in a spring form pan, however you will need to line it quite a bit with plastic wrap and you will need to adjust the size of the layers according to the size of the pan. I have never tried it that way and can't vouch for it.
Here are the layers you will be making, in the order they will appear in the cake, from bottom up:
Chocolate graham cracker crunch
Chocolate ganache
Vanilla joconde sponge
Roasted raspberry cremeux
Raspberry gelée
Light raspberry mousse
White chocolate and almond mirror glaze
Chocolate Graham Cracker Crunch:
55 g milk chocolate, finely chopped
35 g feuilletine - recipe for this is all the way at the bottom
30 g graham cracker crumbs
25 g almond praline paste - recipe for this is all the way at the bottom
1 small pinch of salt
1. Crush the graham cracker into fine crumbs.
2. Break the feuilletine into smaller pieces but not tiny crumbs.
3. Melt the milk chocolate until it is smooth, then add the almond praline paste and salt and mix together.
4. Fold in the graham crumbs and feuilletine. It will get quite thick and chunky.
5. Line a 6-inch pan with cling wrap. Press the mixture into the pan and compact it down tightly (you can use the bottom of a glass to press it down). Try to get it as pressed and thin as possible.
6. Freeze for at least a few hours.
Vanilla Joconde Sponge:
1 large egg (about 50 g)
30 g almond flour
30 g powdered sugar
12 g all-purpose flour
1 large egg white (about 30 g)
8 g granulated sugar
10 g unsalted butter, melted and cooled
1 tsp vanilla bean paste, or ¾ tsp vanilla extract
Pinch of salt
1. Heat oven to 400°F (200°C).
2. Line the bottom of a 6-inch pan with a round of parchment paper.
3. Whisk the whole egg, almond flour, powdered sugar, vanilla, and salt for about 2–3 minutes, until noticeably lighter and slightly foamy.
4. Sift in the all-purpose flour and gently incorporate it.
5. Whip the egg white until foamy. Gradually add the 8 g granulated sugar.
6. Continue whipping until you have glossy medium-firm peaks. Don't take it all the way to a very stiff meringue.
7. Fold about ⅓ of the whipped egg white into the egg mixture to lighten it. Fold in another ⅓, then the final ⅓, being gentle so you don't lose too much air.
8. Take a small spoonful of the batter and mix it thoroughly into the melted butter. Fold that butter mixture back into the batter.
9. Spread the batter evenly in the 6-inch pan and bake for 6-8 minutes, until the top is just barely golden and springy to the touch.
10. Cool completely, then wrap tightly in plastic and freeze for a few hours.
11. Once frozen, unwrap the sponge and shave down either the top or bottom so that the layer is very thin - no more than 1/2 inch tall. You can do this right before attaching it to the crunch layer.
Chocolate Ganache:
\*\*\*Don't make this layer until the sponge layer and the crunch layer are fully frozen and ready for assembly.
25 g dark chocolate, about 60–65%, finely chopped
15 g heavy cream
4 g glucose syrup or light corn syrup
2 g unsalted butter
1/2 tsp vanilla paste
Tiny pinch of salt
1. Put the chopped chocolate in a small bowl.
2. Heat the heavy cream and glucose until steaming hot but not boiling.
3. Pour over the chocolate and let sit for about 1 minute.
4. Stir slowly from the center outward until completely smooth and glossy.
5. Stir in the butter, salt, and vanilla.
6. Let it cool until it thickens to a soft, spreadable consistency.
Assemble the crunch and sponge layers:
Keep the crunch layer in it's pan. Spread the chocolate ganache evenly over the crunch layer. Lay the sponge layer on top of the ganache and press down firmly and evenly on the sponge layer, so that it fully sticks to the ganache and crunch layer. Don't be afraid to evenly squish down the sponge layer a little (but don't make it lumpy). You should now have a crunch layer, ganache layer, and sponge layer all in one pan. Tightly wrap the pan and freeze.
Roasted Raspberry Crèmeux:
\*\*\*Make this layer before the gelee layer, as you will be pouring the gelee onto the frozen crèmeux layer.
150 g raspberries — fresh or frozen
15 g pure maple syrup
5 g lemon juice
1 large egg yolk — about 18 g
20 g granulated sugar
2 g powdered gelatin
10 g cold water, for blooming the gelatin
35 g heavy cream
25 g unsalted butter, softened
Tiny pinch of salt
½ tsp vanilla bean paste
Red food coloring
1. Heat your oven to 350°F (175°C).
2. Put raspberries in a small oven-safe dish and drizzle with the maple syrup.
3. Roast for approximately 20–30 minutes, stirring once or twice. You want the raspberries to collapse and become darker and more concentrated.
4. Cool roasted raspberries, then blend. Pass the purée through fine-mesh sieve to remove the seeds.
5. Stir lemon juice into the purée.
6. Sprinkle the 2 g powdered gelatin over the 10 g cold water. Let it sit for 5–10 minutes.
7. Whisk together the egg yolk, sugar, roasted raspberry purée, and cream.
8. Pour into a saucepan and cook over low to medium-low heat, stirring constantly, until it reaches approximately 180°F (82°C). Don't let it boil!
9. Once thickened to a custard, remove from heat. If need be, strain out any chunks.
10. Add the bloomed gelatin until fully dissolved.
11. Add softened butter, vanilla, and salt. Blend with an immersion blender until completely smooth and glossy. Try to keep immersion blender submerged to avoid making bubbles. Add a few drops of the red food coloring.
12. Pour into a 6-inch pan lined with cling wrap.
13. Wrap the pan and freeze until completely solid, usually a few hours.
Raspberry Gelée:
\*\*\*Make this layer only after the crèmeux is fully frozen.
130 g raspberries, preferably frozen
15 g granulated sugar
5 g fresh lemon juice
2 g powdered gelatin
10 g cold water, for blooming the gelatin
1. Thaw raspberries.
2. Blend raspberries and push purée through fine-mesh sieve to remove seeds.
3. Sprinkle 2 g gelatin over 10 g cold water. Let it sit for 5–10 minutes.
4. Put the raspberry purée and 15 g sugar in a small saucepan.
5. Warm gently until the sugar dissolves and the mixture reaches about 140–160°F. Don't boil.
6. Remove from the heat and stir in the bloomed gelatin until completely dissolved.
7. Stir in lemon juice.
8. Allow to cool, but no enough to solidify. It needs to be pourable.
Assemble gelée and crèmeux layers:
Keep the frozen crèmeux layer in it's pan and gently score the top by making very shallow cut marks. The idea is to rough up the surface a bit so that when you pour on the gelée, it is better able to "grab" onto the crèmeux surface. Once you have scored the top surface, pour the liquid gelée onto the crèmeux layer that is inside the pan. You might need to tilt the pan back and forth a bit to get the gelée to settle evenly. You should now have the crèmeux layer with the gelée on top, all in the same pan. Wrap the pan and freeze until the gelée has completely solidified. Make sure the pan is on a level surface as it freezes.
Light Raspberry Mousse:
340 g fresh raspberries
88 g granulated sugar
10 g powdered gelatin
50 g cold water, for blooming the gelatin
340 g heavy cream
1. Place the fresh raspberries in a saucepan over medium-low heat. Cook gently until they soften and release their juices.
2. Blend raspberries and push purée through fine-mesh sieve to remove seeds.
3. Return the raspberry purée to the saucepan. Add the 88 g sugar and warm gently until the sugar has completely dissolved.
4. Remove from heat and stir in bloomed gelatin until completely dissolved.
5. Transfer mixture to a bowl and cool down to 85–95°F (30–35°C).
6. Whip the heavy cream to soft peaks.
7. Add about 1/3 of the whipped cream to the raspberry mixture and whisk gently to lighten it. Then fold in the remaining whipped cream in two additions.
Assemble the entremet:
The entremet will be assembled upside-down. Take the round entremet mold and put the bottom part (the part without a hole) on a baking sheet or some sort of flat surface that you'll be able to transfer to the freezer, so that the mold remains level as you move it. Pour enough mousse into the mold so that it covers about a 1/2 inch of the bottom. Place the mold in the freezer for no more than ten minutes, checking it frequently. You want the mousse to firm up just enough so that when you place the next layer on top, it won't sink down. Once the mousse has the consistency of slightly-loose pudding, take it out of the freezer. Take the crèmeux-gelée layer and, with the gelée side face down, gently place it into the mold, on top of the slightly-firm mousse layer. Very lightly press it down so that it snuggles into the mousse. Now connect the top part of the mold to the bottom part. You now have the enclosed entremet mold, with a hole at the top. Pour some more mousse into the mold through the hole at the top. The goal is to cover the crèmeux-gelée layer in mousse. Make sure the mousse gets all around the sides of the crèmeux-gelée layer. Pour enough mousse so that the bottom of the crèmeux-gelée layer (that is, the underside of the crèmeux layer since it is placed in the mold upside down) is completely covered, and fill the mold with mousse, leaving an inch from the top hole. Again place the mold in the freezer, this time for no more than 5 minutes. Take it out and place the crunch/sponge layer, sponge side down, through the hole and into the mousse that's in the mold. Gently press the layer into the mousse. You might have a little mousse squeeze out of the top hole as the crunch/sponge layer displaces it. Gently press the sponge/crunch layer into the mousse until the bottom of the crunch layer is flush with the mold opening. Wipe away any excess mousse that might have come out of the mold. Place the mold in the freezer and freeze at least 12 hours. After it has frozen solid, carefully remove from the mold.
White chocolate and almond mirror glaze:
50 g water
75 g granulated sugar
75 g glucose syrup or light corn syrup
100 g white chocolate, finely chopped
20–25 g heavy cream
4.5 g powdered gelatin
22 g cold water, for blooming gelatin
½ tsp vanilla extract
Tiny pinch of salt
Red food coloring
1. Sprinkle the 4.5 g powdered gelatin over the 22 g cold water. Let it sit for 5–10 minutes.
2. Put the chopped white chocolate in a tall, narrow container suitable for an immersion blender.
3. Combine the 50 g water, sugar, and glucose/corn syrup in a saucepan.
4. Heat until the sugar is completely dissolved and bring the syrup to approximately 220–225°F (104–107°C).
5. Remove from heat and stir in heavy cream.
6. Pour the hot mixture over the white chocolate and let it sit for about 1 minute.
7. Add the bloomed gelatin, vanilla, salt, and red coloring.
8. Blend with an immersion blender, keeping the blender head fully submerged to avoid incorporating air. Blend until completely smooth and glossy.
9. Pass the glaze through a fine-mesh sieve as needed.
10. Wait for the glaze to cool down to 85–90°F (30–33°C)
11. Pour the glaze over the center and let it flow naturally over the sides.
Refrigerate the entremet for 1 hour to allow the glaze to set. Defrost the entremets for at least 4 hours in the fridge, then 30 minutes outside the fridge, before serving. Otherwise you run the risk of the gelée being frozen. You can refrigerate the leftovers for a few days. Be sure to use a warm knife when slicing.
Fueilletine:
56 g unsalted butter, room temperature
60 g powdered sugar, sifted
1 large egg, room temperature
60 g all purpose flour
1/4 tsp sea salt (I found this to be a bit much)
1/4 tsp baking soda
14 g molasses
1. Preheat oven to 350°F (177°C).
2. Line two half-sheet baking pans with parchment paper.
3. Cream butter with powdered sugar until smooth.
4. Add egg and beat until combined.
5. Drop 1/4 of the batter onto the prepared baking pan. Use an offset spatula or regular spatula to spread the batter as thin as possible. If you leave even the slightest thick area, it will bake doughy and that spot will be ruined.
6. Bake for 4 to 6 minutes, rotating the pan halfway through. Keep a close eye on it. It's done when there's an even golden brown across the entire surface.
7. Remove from oven and cool on baking sheet for 10-15 minutes. It will crisp up once cooled. Once cooled, break into pieces and store n airtight container.
8. Repeat with the remaining batter. For the recipe above, you only need one pan's worth.
Almond Praline Paste:
\*You will need a food processor for this.
1/2 cup raw sliced almonds
1/2 cup granulate sugar
1/2 Tbsp vegetable oil
1-2 Tbsp water
1. Preheat over to 350°F (177°C).
2. Line a baking sheet with parchment paper.
3. Spread the almond slices out on the baking sheet
4. Bake in the oven in middle rack for 1-2 minutes. Check the almonds and if they are the slightest bit golden, they are done. If not, continue baking in 30 second bursts. They will burn very quickly and easily.
5. Take the almonds out of the oven, leave on the pan and set aside to cool.
6. Place sugar in medium saucepan and add water, just enough to make all of the sugar wet but no more.
7. Set on medium-low heat and don't stir. The sugar will eventually melt, then begin to bubble. The bubbles may look a bit crusty, this is normally. Watch it closely. It will slowly darken in color. As soon as it is a deep golden amber, take it off the heat and quickly pour it over the almonds, using spatula to help it out of the pot. This melted sugar is extremely hot so be careful. Cover the almonds and let the whole thing cool.
8. Once fully cooled, break up the almonds and hardened sugar and place pieces into a food processor.
9. Add oil and blend. It will go through a few stages and different consistencies. You might need to stop and scrape the paste from the edges. After about 4 or 5 minutes, it should look like a fluid paste. If not, keep going. It will get there. You can store this in an airtight container at room temperature.
#drink #food


| 1,000 mlx | |
| 2 | |
| 0 |